> ## Documentation Index
> Fetch the complete documentation index at: https://ai-kb.automationanywhere.com/llms.txt
> Use this file to discover all available pages before exploring further.
# EKB チャットボットを MS Teams に統合する
> EKB を MS Teams に導入する
EKB を Microsoft Teams と統合すると、インテリジェントでコンテキストを認識したチャットをチームのコラボレーション環境に直接導入できます。このガイドでは、Microsoft Teams で EKB チャットボットをセットアップする手順を説明し、Teams インターフェイスから離れることなく AI エージェントとのシームレスな通信を可能にします。
## 前提条件
* ボットを作成するための Azure への管理者アクセス権
* Teams 開発ポータルへの管理者アクセス
## セットアップ手順
### 1. Azure ボットを作成する
1. [Azure dashboard](__PLACEHOLDER_16__) に移動します。
2. \[**リソースの作成**] をクリックします。
3. 検索バーに「`Bot`」と入力し、**Azure Bot** を選択します。
4. 新しい Azure ボットを作成し、目的の **表示名** を設定します。
### 2. ボットを構成する
5. \[**構成**] タブに移動し、サーバー URL を指すように **メッセージング エンドポイント**を更新します。
**Cloud** customers, please enter **PLACEHOLDER\_1**
**On-Premise** customers, please enter **PLACEHOLDER\_2**
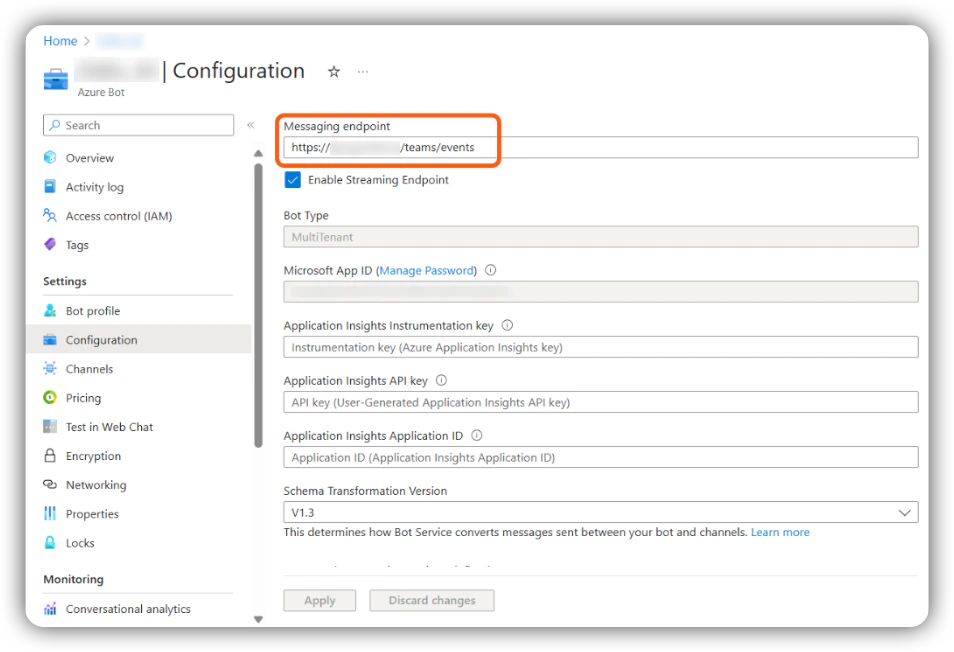 6. \[**構成**] タブで、**アプリ ID** と **テナント ID** をコピーし、**パスワードの管理** に移動します。
7. ボットの新しいパスワードを作成し、後で使用できるように保存します。
8. Azure でボットの **ストリーミング エンドポイント** を有効にし、そのエンドポイントの URL をポイントします。
### 3. Teams チャネルを有効にする
9. Azure portal の左側にある \[**チャネル**] をクリックし、ボットの **Teams** 対話チャネルを有効にします。
### 4. EKB にボットを登録する
Cloud customers, please open a support ticket with AA Support providing your **PLACEHOLDER\_3**, **PLACEHOLDER\_4**, and **PLACEHOLDER\_5** to have the bot registered for you.
10. EKB で、**スーパー管理者** ページに移動し、左側にある **Teams ボット** を選択します。
11. \[**ボットの登録**] をクリックします。
12. 手順 6 ~ 7 で収集した **アプリ ID**、**テナント ID**、**パスワード**を入力します。 \[**ボットの登録**] をクリックします。
### 5. Teams 開発ポータルでアプリを作成する
13. [Teams Developer Portal](__PLACEHOLDER_17__) に移動します。
14. \[**新しいアプリ**] をクリックします。
15. アプリ情報を入力します。
* **簡単な説明** — 必須。空にすることはできません。
* **長い説明** — 必須、空にすることはできません。
16. Azure からのボットのアプリ ID を **アプリ ID** フィールドに入力します。
### 6. ボット機能の構成
17. \[\*\*アプリの機能\*] に移動し、Azure からの **アプリ ID** を指定してボットを追加します。
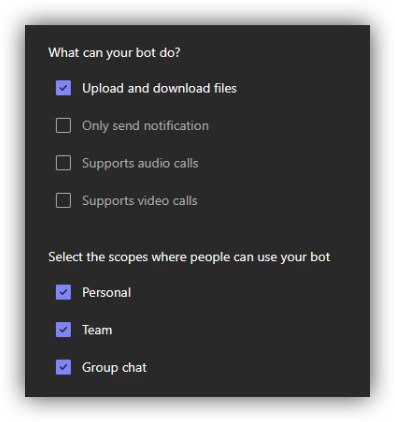
18. ボットの機能を次のように構成します。
6. \[**構成**] タブで、**アプリ ID** と **テナント ID** をコピーし、**パスワードの管理** に移動します。
7. ボットの新しいパスワードを作成し、後で使用できるように保存します。
8. Azure でボットの **ストリーミング エンドポイント** を有効にし、そのエンドポイントの URL をポイントします。
### 3. Teams チャネルを有効にする
9. Azure portal の左側にある \[**チャネル**] をクリックし、ボットの **Teams** 対話チャネルを有効にします。
### 4. EKB にボットを登録する
Cloud customers, please open a support ticket with AA Support providing your **PLACEHOLDER\_3**, **PLACEHOLDER\_4**, and **PLACEHOLDER\_5** to have the bot registered for you.
10. EKB で、**スーパー管理者** ページに移動し、左側にある **Teams ボット** を選択します。
11. \[**ボットの登録**] をクリックします。
12. 手順 6 ~ 7 で収集した **アプリ ID**、**テナント ID**、**パスワード**を入力します。 \[**ボットの登録**] をクリックします。
### 5. Teams 開発ポータルでアプリを作成する
13. [Teams Developer Portal](__PLACEHOLDER_17__) に移動します。
14. \[**新しいアプリ**] をクリックします。
15. アプリ情報を入力します。
* **簡単な説明** — 必須。空にすることはできません。
* **長い説明** — 必須、空にすることはできません。
16. Azure からのボットのアプリ ID を **アプリ ID** フィールドに入力します。
### 6. ボット機能の構成
17. \[\*\*アプリの機能\*] に移動し、Azure からの **アプリ ID** を指定してボットを追加します。
18. ボットの機能を次のように構成します。
 ### 7. デプロイ
19. 新しい Teams アプリケーションを展開するための組織の標準ポリシーに従って、パッケージを展開します。
20. ボットのプロジェクトへのアクセスを構成するには、最初のメッセージとして `!setup` コマンドを送信します。
***
## 推奨される展開方法
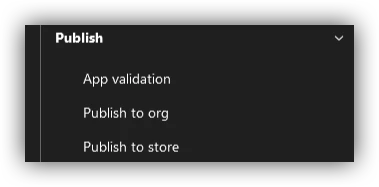
On the app page in the Microsoft Teams Developer Dashboard, scroll to the bottom of the left-hand sidebar. Under **Publish**, select **Publish to org**.
### 7. デプロイ
19. 新しい Teams アプリケーションを展開するための組織の標準ポリシーに従って、パッケージを展開します。
20. ボットのプロジェクトへのアクセスを構成するには、最初のメッセージとして `!setup` コマンドを送信します。
***
## 推奨される展開方法
On the app page in the Microsoft Teams Developer Dashboard, scroll to the bottom of the left-hand sidebar. Under **Publish**, select **Publish to org**.
 The app will be posted to your Teams instance and may require Administrator consent. Consent can be granted from the [Microsoft Teams Admin Center](https://admin.teams.microsoft.com/dashboard).
After consent is granted, allow a few hours for permissions to propagate before the bot becomes usable. This delay is caused by Microsoft's internal review process for custom applications, even when restricted to a single organization.
***
## Teams ボット設定の粒度
初期セットアップが完了したら、`!setup` コマンドをボットに送信して、Microsoft Teams での応答の受信を開始します。
### デフォルトの動作
デフォルトでは、ボット設定の粒度は **ボットごと、Teams インスタンスごと** です。ボット用に構成されたプロジェクト、API キー、シークレットは、すべてのチャネル、グループ、ダイレクト メッセージを含む Teams インスタンス全体に適用されます。
### チャネルごとの設定 (オンプレミスのみ)
チャネル、グループ、ユーザーに応じて複数のプロジェクトで 1 つのボットを使用するなど、より詳細な粒度を実現するには、次のバックエンド環境変数を設定します。\`\`\`env
TEAMS\_USE\_PER\_CHANNEL\_SETTINGS=TRUE
```
This setting is only available for **on-premise customers**. It is not supported for cloud-hosted deployments.
### エージェントの選択
すべての構成で、Teams ボットはプロジェクトの**現在設定されているデフォルト エージェント**と対話します。現在、別のエージェントを選択するオプションはありません。
```
The app will be posted to your Teams instance and may require Administrator consent. Consent can be granted from the [Microsoft Teams Admin Center](https://admin.teams.microsoft.com/dashboard).
After consent is granted, allow a few hours for permissions to propagate before the bot becomes usable. This delay is caused by Microsoft's internal review process for custom applications, even when restricted to a single organization.
***
## Teams ボット設定の粒度
初期セットアップが完了したら、`!setup` コマンドをボットに送信して、Microsoft Teams での応答の受信を開始します。
### デフォルトの動作
デフォルトでは、ボット設定の粒度は **ボットごと、Teams インスタンスごと** です。ボット用に構成されたプロジェクト、API キー、シークレットは、すべてのチャネル、グループ、ダイレクト メッセージを含む Teams インスタンス全体に適用されます。
### チャネルごとの設定 (オンプレミスのみ)
チャネル、グループ、ユーザーに応じて複数のプロジェクトで 1 つのボットを使用するなど、より詳細な粒度を実現するには、次のバックエンド環境変数を設定します。\`\`\`env
TEAMS\_USE\_PER\_CHANNEL\_SETTINGS=TRUE
```
This setting is only available for **on-premise customers**. It is not supported for cloud-hosted deployments.
### エージェントの選択
すべての構成で、Teams ボットはプロジェクトの**現在設定されているデフォルト エージェント**と対話します。現在、別のエージェントを選択するオプションはありません。
```