> ## Documentation Index
> Fetch the complete documentation index at: https://ai-kb.automationanywhere.com/llms.txt
> Use this file to discover all available pages before exploring further.
# Integrate EKB Chatbot to MS Teams
> Bring EKB to MS Teams
Integrating EKB with Microsoft Teams allows you to bring intelligent, context-aware chat directly into your team's collaboration environment. This guide walks you through the steps to set up the EKB chatbot in Microsoft Teams, enabling seamless communication with your AI agent without leaving the Teams interface.
## Prerequisites
* Admin access to Azure to create the bot
* Admin access to Teams Dev Portal
## Setup Steps
### 1. Create the Azure Bot
1. Go to the [Azure dashboard](https://portal.azure.com/).
2. Click **Create Resource**.
3. Type `Bot` in the search bar and select **Azure Bot**.
4. Create a new Azure Bot and set the desired **Display Name**.
### 2. Configure the Bot
5. Go to the **Configuration** tab and update the **Messaging Endpoint** to point to your server URL.
**Cloud** customers, please enter `https://api.getodin.ai/teams/events`
**On-Premise** customers, please enter `/teams/events`
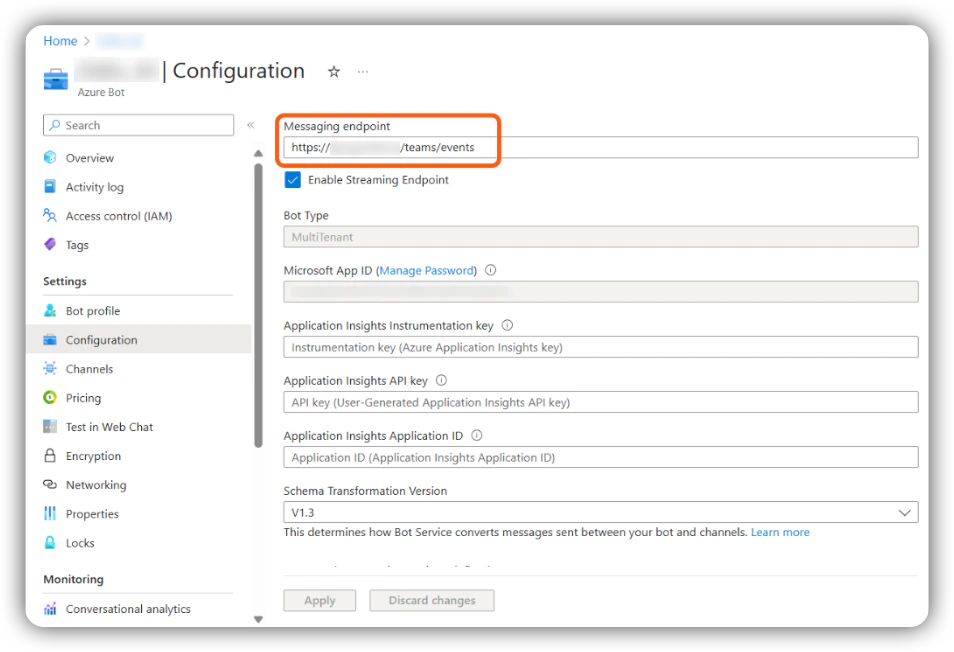 6. In the **Configuration** tab, copy the **App ID** and **Tenant ID**, then navigate to **Manage Passwords**.
7. Create a new password for the bot and save it for later use.
8. Enable a **streaming endpoint** for the bot in Azure and point it to the URL for that endpoint.
### 3. Enable Teams Channel
9. Click **Channels** on the left side of the Azure portal and enable the **Teams** interaction channel for the bot.
### 4. Register the Bot in EKB
Cloud customers, please open a support ticket with AA Support providing your `App ID`, `Tenant ID`, and `App Password` to have the bot registered for you.
10. In EKB, navigate to the **Super Admin** page and select **Teams Bots** on the left-hand side.
11. Click **Register Bot**.
12. Enter the **App ID**, **Tenant ID**, and **Password** collected in steps 6–7. Click **Register Bot**.
### 5. Create the App in Teams Dev Portal
13. Go to the [Teams Developer Portal](https://dev.teams.microsoft.com/apps).
14. Click **New App**.
15. Populate the app information:
* **Short Description** — required, cannot be empty.
* **Long Description** — required, cannot be empty.
16. Populate the **App ID** field with the bot's App ID from Azure.
### 6. Configure Bot Features
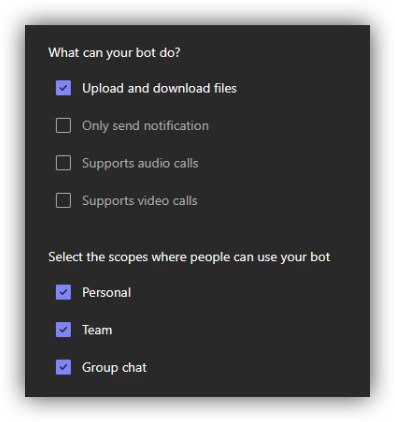
17. Go to **App Features** and add the bot, providing the **App ID** from Azure.
18. Configure the bot capabilities as follows:
6. In the **Configuration** tab, copy the **App ID** and **Tenant ID**, then navigate to **Manage Passwords**.
7. Create a new password for the bot and save it for later use.
8. Enable a **streaming endpoint** for the bot in Azure and point it to the URL for that endpoint.
### 3. Enable Teams Channel
9. Click **Channels** on the left side of the Azure portal and enable the **Teams** interaction channel for the bot.
### 4. Register the Bot in EKB
Cloud customers, please open a support ticket with AA Support providing your `App ID`, `Tenant ID`, and `App Password` to have the bot registered for you.
10. In EKB, navigate to the **Super Admin** page and select **Teams Bots** on the left-hand side.
11. Click **Register Bot**.
12. Enter the **App ID**, **Tenant ID**, and **Password** collected in steps 6–7. Click **Register Bot**.
### 5. Create the App in Teams Dev Portal
13. Go to the [Teams Developer Portal](https://dev.teams.microsoft.com/apps).
14. Click **New App**.
15. Populate the app information:
* **Short Description** — required, cannot be empty.
* **Long Description** — required, cannot be empty.
16. Populate the **App ID** field with the bot's App ID from Azure.
### 6. Configure Bot Features
17. Go to **App Features** and add the bot, providing the **App ID** from Azure.
18. Configure the bot capabilities as follows:
 ### 7. Deploy
19. Deploy the package following your organization's standard policy for deploying new Teams applications.
20. To configure the bot's access to projects, send it the `!setup` command as a first message.
***
## Recommended Deployment Method
On the app page in the Microsoft Teams Developer Dashboard, scroll to the bottom of the left-hand sidebar. Under **Publish**, select **Publish to org**.
### 7. Deploy
19. Deploy the package following your organization's standard policy for deploying new Teams applications.
20. To configure the bot's access to projects, send it the `!setup` command as a first message.
***
## Recommended Deployment Method
On the app page in the Microsoft Teams Developer Dashboard, scroll to the bottom of the left-hand sidebar. Under **Publish**, select **Publish to org**.
 The app will be posted to your Teams instance and may require Administrator consent. Consent can be granted from the [Microsoft Teams Admin Center](https://admin.teams.microsoft.com/dashboard).
After consent is granted, allow a few hours for permissions to propagate before the bot becomes usable. This delay is caused by Microsoft's internal review process for custom applications, even when restricted to a single organization.
***
## Teams Bot Settings Granularity
After completing the initial setup, send the `!setup` command to the bot to begin receiving responses in Microsoft Teams.
### Default Behavior
By default, bot settings have **per-bot, per-Teams-instance** granularity. The project, API key, and secret configured for the bot apply across the entire Teams instance — including all channels, groups, and direct messages.
### Per-Channel Settings (On-Premise Only)
For greater granularity — such as using one bot with multiple projects depending on the channel, group, or user — set the following backend environment variable:
```env theme={null}
TEAMS_USE_PER_CHANNEL_SETTINGS=TRUE
```
This setting is only available for **on-premise customers**. It is not supported for cloud-hosted deployments.
### Agent Selection
In all configurations, the Teams Bot interacts with the project's **currently set default agent**. There is currently no option to select a different agent.
The app will be posted to your Teams instance and may require Administrator consent. Consent can be granted from the [Microsoft Teams Admin Center](https://admin.teams.microsoft.com/dashboard).
After consent is granted, allow a few hours for permissions to propagate before the bot becomes usable. This delay is caused by Microsoft's internal review process for custom applications, even when restricted to a single organization.
***
## Teams Bot Settings Granularity
After completing the initial setup, send the `!setup` command to the bot to begin receiving responses in Microsoft Teams.
### Default Behavior
By default, bot settings have **per-bot, per-Teams-instance** granularity. The project, API key, and secret configured for the bot apply across the entire Teams instance — including all channels, groups, and direct messages.
### Per-Channel Settings (On-Premise Only)
For greater granularity — such as using one bot with multiple projects depending on the channel, group, or user — set the following backend environment variable:
```env theme={null}
TEAMS_USE_PER_CHANNEL_SETTINGS=TRUE
```
This setting is only available for **on-premise customers**. It is not supported for cloud-hosted deployments.
### Agent Selection
In all configurations, the Teams Bot interacts with the project's **currently set default agent**. There is currently no option to select a different agent.