

EK’s generic SAML flow works with Azure AD / Entra ID out of the box. If you haven’t already, read the SAML SSO Overview to understand how the integration works before you begin.
Prerequisites
- You have admin access to your Azure AD / Entra ID tenant.
- You have Super Admin access to your on-premise EK instance.
- You know the fully qualified domain name (FQDN) of your EK backend host (e.g.
ek-api.corp.acme.com). - You know the email domain you want to enable SSO for (e.g.
acme.com).
Part 1 — Configure Azure AD
Create a New Enterprise Application in Azure AD
1
Create a new enterprise application
In the Azure portal, navigate to Azure Active Directory → Enterprise applications and click New application. Select Create your own application, give it a name (e.g.
EK SSO), and choose Integrate any other application you don’t find in the gallery (Non-gallery).2
Open the SSO configuration
Once the application is created, navigate to Manage → Single sign-on and select SAML as the sign-on method.
3
Enter the Basic SAML Configuration
In the Basic SAML Configuration section, enter the following values:
4
Configure attributes and claims
In the Attributes & Claims section, confirm or add the following mappings:
Part 2 — Retrieve the Azure AD Metadata
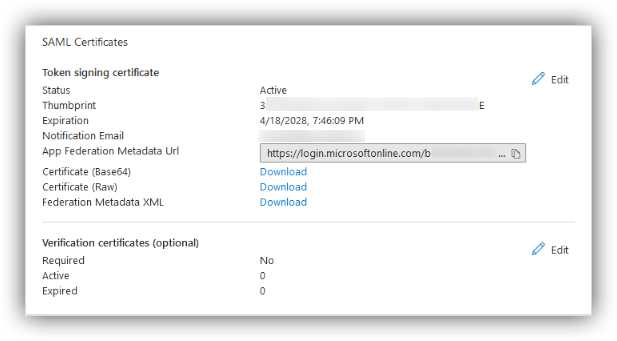
Once the Azure AD application is configured, retrieve the federation metadata URL:1
Go to the SAML Certificates section
In your application, navigate to Manage → Single sign-on → SAML Certificates.
2
Copy the App Federation Metadata URL
Find and copy the App Federation Metadata URL.The path is:You will need this URL in Part 3.
Part 3 — Register the Domain in EK
Send aPOST request to the domain registration endpoint:
Required Fields
Authentication
The endpoint requires your EK API Key and Secret passed asX-API-KEY and X-API-SECRET headers.
On success, a record is created in the sso_providers table on the backend.
Part 4 — Configure the Frontend
Once the domain is registered, set the frontend environment variable and restart the frontend service.1
Open the frontend environment file
On your on-premise deployment server, open
onprem-deployment/.env.web.2
Add the environment variable
Add the following line, replacing
acme.com with your actual email domain:3
Restart the frontend services
Test the Integration
Sign in to EK with a real@<domain> user to confirm the flow works end to end. If the user authenticates successfully but is denied access, check your SAML Access Controls configuration — see the EK SAML Access Controls and Automated Team/Project Assignment guide.