

This guide is written for IT and identity administrators managing an on-premise EK instance. Any reference to “your IdP,” “your IdP administrator,” or “your email domain” refers to your organization’s own infrastructure — not anything managed by Automation Anywhere.
Prerequisites
Before you begin, confirm the following:- Your on-premise EK deployment is running with both the backend (
<your-backend-host>) and frontend (<your-frontend-host>) reachable from the user’s browser. The IdP only needs to receive HTTP-POST SAML responses at<your-backend-host>/user/generic/sso/saml/acs/admin— it does not need direct outbound connectivity to your backend if you supply SP metadata as a downloaded file. - You are signed in to EK as a Super Admin. The SSO Metadata tab and all its underlying endpoints are restricted to Super Admins.
- Your IdP is SAML 2.0 compliant and can either consume an SP metadata XML / URL, or be manually configured with an SP entity ID and ACS URL.
- Your IdP is configured to send the user’s email address as the SAML
NameID, using the formaturn:oasis:names:tc:SAML:1.1:nameid-format:emailAddress. EK uses the NameID to look up or provision user accounts. - You know the email domain you want to enable SSO for (e.g.
acme.com). SSO is keyed by domain, so all users sharing that domain —alice@acme.com,bob@acme.com, etc. — will be routed to the same IdP. - You know which frontend SSO mode your deployment is running. This is controlled by the
VITE_ALLOW_ONLY_SSO_LOGINenvironment variable on the frontend:true— single-click SSO. The domain is hard-coded viaVITE_SSO_ENTERPRISE_IDand must exactly match the domain you upload metadata for.false(default) — email-modal SSO. The domain is derived from the user’s email at sign-in. Multiple domains can each have their own uploaded metadata.
Part 1 — Provide SP Metadata to Your IdP
Your IdP administrator needs to register EK as a SAML application in your IdP before you can upload any IdP metadata. EK makes this straightforward by publishing its SP metadata through a public, well-known endpoint — no manual field copying required.The SP Metadata Endpoint
The EK backend publishes its SP metadata at:EntityDescriptor containing your instance’s Entity ID, ACS URL, required NameID format, and SP signing certificate (when configured). The endpoint is unauthenticated by design so your IdP can fetch it directly.
How to Share the SP Metadata
Option A — Provide the URL
Option A — Provide the URL
If your IdP can reach the EK backend host, send your IdP administrator the well-known URL directly:Most modern IdPs (Okta, Entra ID, Ping, OneLogin, Auth0, etc.) can import SP metadata from a URL and will auto-populate the SP configuration — Entity ID, ACS URL, NameID format, and signing certificate — from it.
Option B — Download and Hand Off the File
Option B — Download and Hand Off the File
If your IdP cannot reach the backend host directly — common in segmented networks, air-gapped environments, or when your IdP is a SaaS outside your corporate perimeter — download the XML and pass it to your IdP administrator out of band:Your IdP administrator uploads
ek_sp_metadata.xml in the IdP’s SAML application configuration screen. You only need to re-export and re-upload when the SP configuration changes — typically a backend hostname change, SP signing certificate rotation, or Entity ID override change.Manual Configuration (When the IdP Cannot Consume Metadata)
If your IdP requires fields to be entered manually, use the values from the SP metadata XML. The most commonly required fields are:What Your IdP Administrator Needs to Give Back
Once the SAML application is created in your IdP, ask your IdP administrator for the IdP SAML metadata XML. This is the file you will upload in Part 2. Almost every IdP can produce this file. Common names for it in IdP UIs:
The XML must be a valid SAML 2.0
EntityDescriptor containing an IDPSSODescriptor with at least the IdP’s entityID, a SingleSignOnService location and binding, and the IdP’s signing certificate so EK can verify assertions.
Part 2 — Upload the IdP Metadata
With the IdP metadata XML in hand, you can now register it against an email domain in your EK instance.Open the SSO Metadata Tab
1
Sign in to EK
Sign in to EK as a Super Admin.
2
Open the Super Admin Dashboard
Go to your account menu in the top right and click Super Admin Dashboard.
3
Go to the SSO Metadata tab
Switch to the SSO Metadata tab. You’ll see a table of existing domain → metadata mappings with three columns:
- SSO Domain — the email domain the metadata is registered against (e.g.
acme.com). - Updated — the last time metadata for that domain was uploaded or replaced.
- Actions — controls to download, update, or delete the stored metadata for that row.
Add Metadata for a New Domain
1
Open the Add Metadata dialog
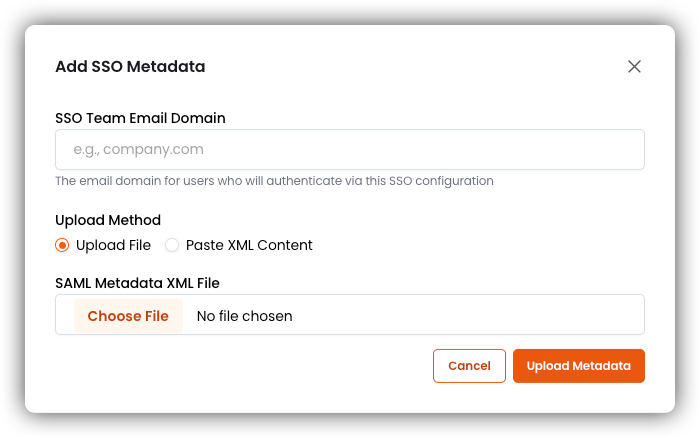
Click Add Metadata in the top right of the SSO Metadata tab. If no domains are configured yet, you can also click it from the empty-state card.
2
Enter the email domain
In the SSO Team Email Domain field, enter the domain SSO should apply to — for example
acme.com. Use only the domain portion of the email address: no @, no path, no scheme. The value is normalized to lowercase on save.3
Choose your upload method and provide the XML
- Upload File
- Paste XML Content
Select the
.xml file your IdP administrator provided. Only files with an .xml extension are accepted.4
Submit
Click Upload Metadata. The dialog closes, a toast notification confirms the upload, and the new domain appears in the table.
Each domain can have at most one active IdP metadata document at a time. Re-uploading for the same domain replaces the existing metadata — see Update Metadata for an Existing Domain below.
Update Metadata for an Existing Domain
IdPs rotate signing certificates and occasionally change endpoints. When this happens, coordinate with your IdP administrator so the new XML is uploaded to EK before the IdP starts signing assertions with the new key.1
Find the domain row
Locate the domain in the SSO Metadata table.
2
Click Update
Click Update in the row’s Actions column.
3
Provide the new XML
The Update SSO Metadata dialog opens with the domain pre-filled and locked. You cannot change the domain on an update — if you need to repurpose the entry, delete it and re-add it. Choose your upload method and provide the new XML as you would for a new domain.
4
Submit
Click Update Metadata. The replacement takes effect immediately — the next SSO sign-in for that domain will use the new metadata.
Download the Currently Stored Metadata
Click the download icon in the row’s Actions column. The file is saved as<domain>_saml_metadata.xml.
Useful for:
- Confirming which IdP metadata is currently active on this EK instance.
- Providing a copy to your security or compliance team for audit.
- Taking a backup before performing an update.
Delete Metadata for a Domain
1
Click Delete
Click Delete in the row’s Actions column.
2
Confirm
In the confirmation dialog, read the warning, tick the acknowledgement checkbox — “I understand this will disable SSO for all users in this domain” — and click Delete.
Deletion is irreversible. After deleting:
- EK no longer has IdP metadata on file for that domain.
- Any new SSO sign-in attempts from
@<domain>users will fail. - Existing accounts — email/password, Google OAuth, or accounts provisioned by previous SSO sign-ins — are not deleted, but those users will no longer be able to sign in via SSO.
End-to-End Checklist
Use this as a runbook when enabling SAML SSO for a new email domain on your on-premise EK instance.1
Share EK SP metadata with your IdP administrator
Give your IdP administrator the SP metadata from your EK backend — not the frontend host.
- If your IdP can reach the backend directly, point them at:
- Otherwise, download the XML and pass it out of band:
2
Your IdP administrator creates the SAML application
Once they have the SP metadata, your IdP administrator registers EK as a SAML application in your IdP. Confirm with them that:
- The NameID is set to the user’s email address.
- Assertions are signed.
- The audience / Entity ID matches the value in EK’s SP metadata.
3
Receive the IdP metadata XML
Ask your IdP administrator for the IdP metadata XML once the application is created. This is the file you will upload in the next step.
4
Upload the IdP metadata to EK
Sign in to EK as a Super Admin, open Super Admin Dashboard → SSO Metadata, and click Add Metadata. Enter the email domain and upload the XML.
5
Test sign-in
Test with a real
@<domain> user. If the user authenticates successfully but is denied access, check your SAML Access Controls configuration — see the SAML Access Controls guide.6
Document the change
Record the following in your internal change-management system: the domain, the IdP type, the date of upload, and which Super Admin performed the upload.
7
Schedule a metadata refresh
Note when your IdP signing certificate is due to rotate and set a reminder to upload updated metadata before that date. Use the Update action in the SSO Metadata tab when new metadata is available.
Running into issues? See the SSO Troubleshooting & Reference guide.